I was planing on testing some variations of the vessel we tested last week but I didn't have time to print them this week. Once I get better at printing I will feel more comfortable leaving the printer unattended.
Buren and I played Squash today and talked about development. We pretty much decided that until we get the tensile tester going there is not much we can do on pressure vessel development. The concept is proven anyway, going forward it will be about optimisation. Since the parts for the tester will take a few weeks to get here we decided to press ahead with a proof of concept combustion chamber. It will be basic; no nozzle/throat, just a fitting, injector and tube. After pressure vessel I think the injector will be the next hardest bit. I think cooling will be hardest bit. So the aim for next weekend is to test a basic chamber using GOX as the oxidiser. I always planed on using nitrous oxide but I figure GOX will give us a good feel for the heating issues and is cheaper. I have ordered all the parts we need have am reading up on the safety aspects of GOX as i've never worked with it before. I have a few really cool non-conventional ideas for all-plastic 3d-printed injectors. I have also been thinking about nozzles.
Saturday 1 February 2014
Wednesday 29 January 2014
Pressure vessel test
On the weekend I tested I tested two of the pressure vessels discussed in my last post, one treated/smoothed with acetone, one untreated (identical otherwise). I think the dimensions I might have quoted were wrong. Both had 1/8' BSP threads tapped into them by hand.
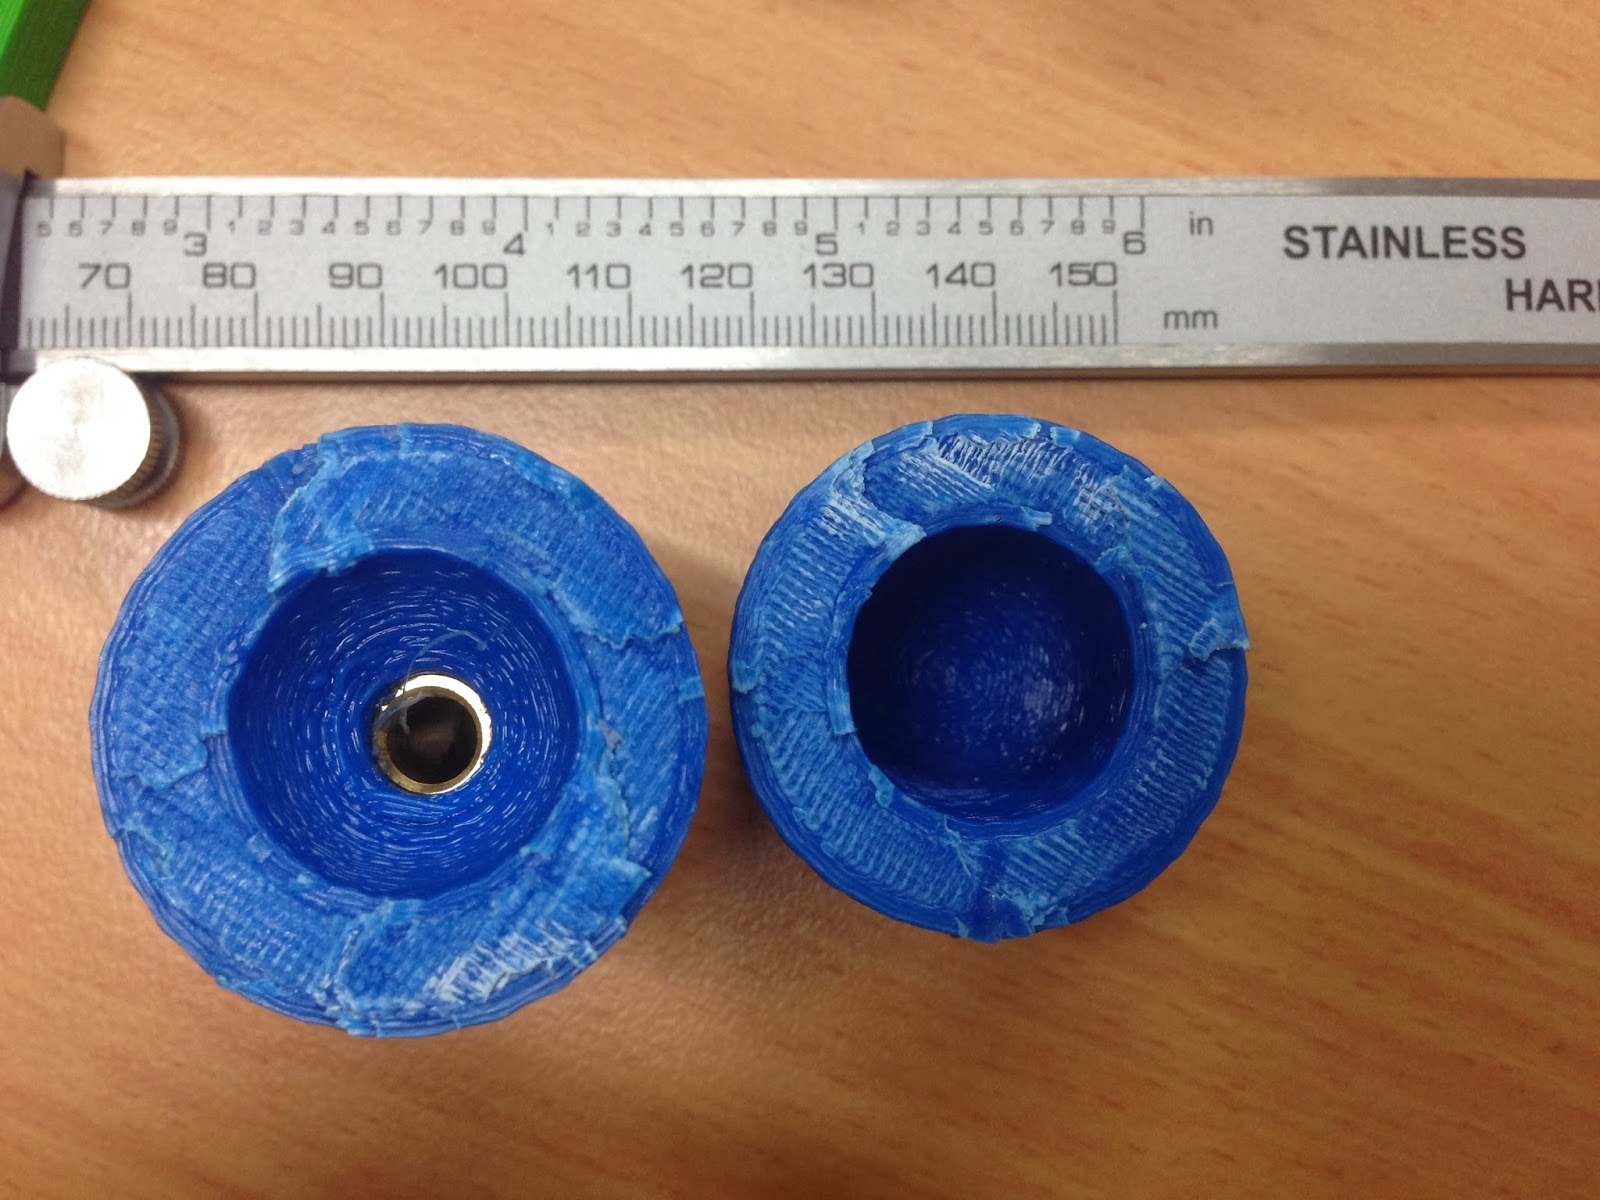
The treated vessel burst fractured into two halves at 2700PSI. The untreated vessel had a small crack in the same spot as the treated one at around 2100. Unfortunately I forgot to press record on the gauge camera for the second test so I dont know the exact pressure but it was >2100. It is encouraging that both fractured at the same spot. I was happy that the untreated vessel did not leak, since my early tests with the other 3D printed seem to suggest that sealing was hard. It seems like compaction is the key.
I split the untreated vessel by hand so I could see what the fracture looked like. Its really cool how the plastic turns white where it's stressed. It seems like the stress in the plastic was around 22MPa. This is around %50 of ABS's UTS which seems a bit high. Might have to brush up on my thick walled pressure vessel theory. The fracture patterns are interesting.... not exactly sure what they mean. It's probably significant that Might also have to brush up on my fracture mechanics.....
I am really excited that simply drilling and tapping the port is enough. I was not looking forward to gluing each fitting in. Seeming as not treating the prints with acetone works I think thats the direction we want to head in. The less post processing the better.
We've ordered most of what we need to build a tensile tester. I spent a few hours in a hardware store on saturday taking apart a pressure washer, trying to figure our how to couple to it. I can get fittings online but am impatient. I put it back together only to realise (after getting back to the office) I forgot to tighten one of the high pressure threads. I decided to go back and tighten it which took another long time as I didn't want someone to get hurt when they used it. I have a bunch more to write about, more to come....
Monday 20 January 2014
Slowly Slowly
The 3D printer came about a a week and a half ago but I only got time to set it up on the weekend. I had a few problems initially but one of the people at work has the same printer so he helped me get it going. The pain problem I was having was that the prints weren't sticking to the kapton coated heated bed bed. Apparently glass coated with hairspray is the way to go for ABS printing, I cut a piece of plain glass to size and haven't had any problems. My first few attempts at printing the pressure pressure vessel from previous posts failed due to printer or filament feeding failure but I think i've got the hang of it now.
Yesterday I managed to print a cylindrical vessel with the volume of two 30mm spheres with a 10mm wall thickness:


Yesterday I managed to print a cylindrical vessel with the volume of two 30mm spheres with a 10mm wall thickness:
From the highly reliable blow test it seems to be pressure tight but we will see.
I had a brief play around with some of the slicing settings but I have only just begun to explore them. I am using the "repetier" software to control the printer with the "Slic3r" slicer to generate the G-code. It was printed with 0.3mm layer height and +- 45 degree solid infill. For some of the print I increased the flow rate of plastic so it would be more compacted but its pretty arbitrary anyway. Aside from stress concentrations I can't see any advantage to printing with smaller later heights got better resolution; they take a lot longer.
I also played around with using acetone to melt together a failed print. Just a few seconds immersed made a huge difference to the surface roughness. Acetone might help with sealing but I can't see how it would change the strength between layers for a solid print. One idea I had is that I could probably soften the plastic to enable a threaded fitting to be inserted with no epoxy to hold it in, since the thread should hold its shape after
So hopefully Buren and I will get to do some testing this weekend. Other things we need to do are build a tensile tester and a hydro-tester. I was going to base the tensile tester on two pneumatic rams connected to a regulator. I just need some way to make sure the whole thing doesn't fly apart when the test piece breaks. I was planing on basing the hydro-tester on a pressure washer with a accumulator to smooth out the pressure. I haven't managed to find a suitable accumulator yet. There some designed for hydraulic systems but they are expensive. I was thinking about using one of the super high pressure pipe-tanks from the nitrous project (good to 10,000PSI) but I would prefer the air and water to be physically separated. Much do, so stress, such little time.
Tuesday 24 December 2013
Purchased 3D printer
I bought a 3D printer about a month ago but it still hasn't shipped. Actually I bought %25 of a 3D printer with Buren kindly paying for the rest. After weighing up a few options I went for a "Solidoodle 3"; it seemed like the best value printer that came assembled and was in stock. It should be here in a few weeks time.
Aside from that nothing has been happening rocketry wise. Buren and I have had a few discussions about how to attack development of a mainly plastic 3D printer hybrid. The plan so far is: once the printer arrives Burn will start with some material testing and data gathering while I dive into tank design. There is very little data available for pieces printed on hobbyist 3D printers. Aside from RC parts there don't seem to be many people using hobbyist 3D printers in structural applications. I am anticipating reliability/repeatability to be a major issue. I want to get a really good understanding of how the seemingly infinite number of printing parameters affect strength. It would be a shame if we developed an engine that worked some of the time on our printer but other people couldn't copy it....
Aside from that nothing has been happening rocketry wise. Buren and I have had a few discussions about how to attack development of a mainly plastic 3D printer hybrid. The plan so far is: once the printer arrives Burn will start with some material testing and data gathering while I dive into tank design. There is very little data available for pieces printed on hobbyist 3D printers. Aside from RC parts there don't seem to be many people using hobbyist 3D printers in structural applications. I am anticipating reliability/repeatability to be a major issue. I want to get a really good understanding of how the seemingly infinite number of printing parameters affect strength. It would be a shame if we developed an engine that worked some of the time on our printer but other people couldn't copy it....
Saturday 16 November 2013
The last year and 3D printed pressure vessel.
I haven't done any rocketry at all this year because i've been terminally busy working on a startup for inkjet printing PCB's in silver nano-particles. We've released the printer now so hopefully I should have some time for rocketry though it won't be much. We released the printer on kickstarter, you can find it here. Everything considered it was a pretty interesting year. I got to learn about business stuff and other interesting things I hadn't really cared much for until now. Also I learnt a bunch more about electronics! Readers who are that way inclined may also notice an improvement in my spelling too! Though I am not sure if I can keep that up here...
Buren joined the airforce at the beginning of this year and spent most of the year away doing training but he is back in Brisbane now and keen to get back into rocketry. We had lunch yesterday and talked about a new project we could work on. I have basically no money at the mount so a big project is out of the question but we came up with a few ideas for smaller projects which haven't been done before, mainly neighbourhood of 3D printing.
Call me a mechanical engineer but in the past I have been pretty sceptical about the usefulness of plastic 3D printing. I never really saw any application for printed parts as structural components. In the company I was exposed 3D printing fanatics and I think I caught the bug. They got me thinking about printing high load bearing parts from plastic. Something I thong would be really cool is to print an entire hybrid motor (tank and all) in one piece.
This isn't as crazy as it might initially seem. Porosity is probably the biggest issue but airtightness can be achieved by sealing with epoxy or partially dissolving it with a solvent depending on what sort of plastic you're using. Strength was my main issue but even if you assume the strength between layers is 5% (papers say 5-20%) you can just make parts thicker. They will be heavy but there isn't any reason why they shouldn't hold up. Heat is obviously a major issue but for a hybrid I think it would be possible with a clever injector design. So I think printing an entire hybrid from plastic would be a really interesting challenge and not too costly either as I have pretty much everything I would need.
I figure the hardest bit will probably be the pressure vessel. The other day I made a simple test vessel. Its pretty basic, just a 20mm ID sphere. I don't have my own 3D printer but we have one I can use at work. Unfortunately it only can print in PLA. The wall thickness is 10mm. Assuming a inter-layer strength 10% of low strength PLA (difficult to tell what I have) it should be good to 850PSI (leaks will be the main issue) I think there will be much better materials than PLA (have ben doing a bunch of research) but for now I will have to put up with it.


The first attempt was printed at a density of 20% and it had a bunch of leaks. It skipped a layer half way which probably didn't help so for the second attempt I printed at 100% density. I made the hole for the fitting slightly smaller so I could drill and tap it. In the end I just epoxied it in because I didn't want it flying out. I would like to do some tests on tapped threads in the future. I am not sure I will ever be able to print a thread using a hobbyist printer but thats something to explore too! I tested it with compressed air @120 PSI and there was a really small leak. I was pretty happy with this as the printer I am using wasn't set up well and there are pretty big gaps between layers. I should be able to improve this with tweaking. I ended up pouring a bit of super glue in which plugged the hole. Now it doesn't leak at 120PSI. Unfortunately I don't have any source of higher pressure to test it currently. The startup is currently in a large industrial complex owned by a university and there are a few gas cylinders....around. One night I went out to try a few but unfortunately they are all empty....I've been thinking about buying a high pressure dive compressor for a while now, this would be a good excuse!
I think I will also buy a 3D printer just for experimentation. I also want to get a bunch of different types of plastic to test with. There are some nylon ones with a fairly high UTS which look promising. More to come!
Wednesday 5 December 2012
Whats been happening lately
Very little rocketry has been happening lately because of exams and another project I have been working on. A friend of mine has been working on an idea for a while suggested that we apply for the iLab "incubator" program (not really thinking we would get in) which is a startup accelerator program. Everything happened pretty quickly, over a the course of a weekend we finished a proof of concept and got past the first round. Then we went to a 4 day assessment and got into the program which provides funding and mentoring. I will talk about it eventually but we want to keep the product quiet for now. Last week I quit my job to work on it time so I wont be able to afford to keep the workshop next year or have a particulary big rocketry budget. The timing of everything worked out fairly well because the lease on the workshop ended last month (we got a 1 month extension to move everything out) so I will be moving back into my garage. Also I am graduating at the end of this year so now was the ideal time to leave my job (was a cadet at Baulderstone (Australian construction engineering company)). I am planing on going a masters next year but depending on how the startup goes I might postpone it.
I have mixed feelings about the workshop. It was great to have a dedicated space where you could make noise late at night but it was also expensive and I feel like we could have done more with the money. Someone pointed out to that the real value is having a location that you can test at and I think that is right. Being able to just walk outside and test something in a fairly remote location (known is around on the weekend) was great and I think I took it for granted. In future testing will be a day or weekend long activity.
So I am not entirely sure what will be happening rocketry wise. I am meeting with Burren and Sam tomorrow night to discuss things. I have been wanting to turn choked flow into more of a group as opposed to myself driving things and now might be a good time to do that. Realistically I don't think I will have enough time or money to work on any large rocketry projects for a while. I was thinking that a good way to start more group orientated stuff and attract more members is to start a new project from scratch to build up everyones skills. The hovering rocket was good but I was really the only one who could do/was interested in the programming/electronics and Bart was the only one who understood the control in-depth. I was thinking a cool project to develop team wok/skills could be another nitrous oxide bi-propellant thruster with a electric nitrous decomposition pre chamber. I think that if we could demonstrate a simple proof of concept and made everything open there would be a good chance of getting some money from kickstarter but it will depend on what everyone else wants to do. Something else I have been itching to try out is a roll stabilised clear payload for a HPR which could be used to stabilise a camera.
Also on the 15th I tested thruster 2 again with the 20Kg load cell. The results were pretty much the same, just slightly smoother and higher resolution. Thrust was slightly lower than expected with a max of about 4.5Kg but I think that was because of calibration.

Considering that thrust would be used in the top %30 its range this is probably good enough to fly the rocket. Also I think we could improve this significantly by making the injector smaller.
Sunday 4 November 2012
Thruster roughness frequency
I always figured that the thrust roughness was random but I thought I would do a FFT to see if it actually was.


As it turns out there is allot of thrust variation at 31Hz which is the frequency the solenoid pulses at. I really wanted to believe that the roughness was just some artifact of the setup or issue with the engine but its clearly not. Highly Sensicial! Makes me wonder how much the roughness can actually be minimised.....
Subscribe to:
Posts (Atom)